
On this tutorial, we’ll discover tips on how to implement OAuth 2.1 for MCP servers step-by-step. To maintain issues sensible, we’ll construct a easy finance sentiment evaluation server and safe it utilizing Scalekit, a device that makes organising OAuth each quicker and simpler.
With Scalekit, all we have to do is expose a metadata endpoint URL for MCP shoppers to find the server and add authorization middleware for safe token-based authentication. Scalekit handles all of the advanced OAuth 2.1 flows behind the scenes, so that you don’t must manually implement or handle token era, refresh, or validation. As soon as this setup is full, your MCP server is able to deal with authenticated requests seamlessly. Take a look at the FULL CODES here.
Alpha Vantage API
To fetch inventory information sentiment, we’ll use the Alpha Vantage API. To get a free API key:
- Go to the Alpha Vantage platform utilizing this link
- Enter your electronic mail and the required particulars.
- You’ll obtain your API key—copy it and retailer it securely, as you’ll want it to authenticate your requests.
Node JS
To run the MCP Inspector for testing our software, we want Node.js put in.
- Obtain the newest model of Node.js from nodejs.org
- Run the installer.
- Hold the default settings and full the set up.
Python Dependencies
pip set up fastapi fastmcp mcp scalekit-sdk-pythonScalekit
To start out utilizing Scalekit, observe these steps:
Create Your Scalekit Account
- Go to scalekit.com and join.
- Scalekit provides a free tier, so that you don’t want to fret about billing.
- As soon as signed in, click on “Activate Full-Stack Auth.”
Set Up Permissions
- Open the Authorization panel.
- Underneath the Permissions part, click on “Add Permission.”
- Use the next values:
Permission Identify: information:learn
Description: Use Alpha Vantage to get Inventory Sentiment
Permissions in Scalekit are used to outline and handle scopes that management what options or assets your software can entry. For instance, the information:learn permission permits your MCP server to entry inventory sentiment information from Alpha Vantage, whereas different permissions may very well be created to gate extra options or APIs inside your software.
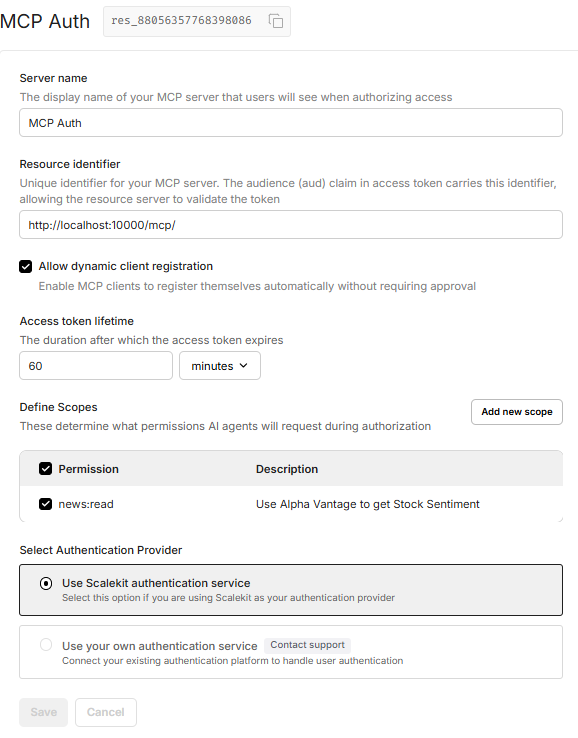
Add Your MCP Server
- Go to the MCP Servers part and click on “Add MCP Server.”
- Fill within the required fields:
Server Identify: Any title you favor.
Useful resource Identifier: A novel identifier to your MCP server. This worth is included within the aud declare of entry tokens, serving to the server validate requests.
For native testing, set it as:
http://localhost:10000/mcp/When utilizing FastMCP, the /mcp path is routinely added to the endpoint. Make certain to incorporate the trailing slash on the finish to keep away from configuration points. Take a look at the FULL CODES here.
Set the scope to the permission you simply created: information:learn
As soon as the server is created, Scalekit will generate your useful resource metadata. Remember to word down the MCP Server Identifier (discovered subsequent to the server title, e.g., res_88056357768398086), as you’ll want it later.
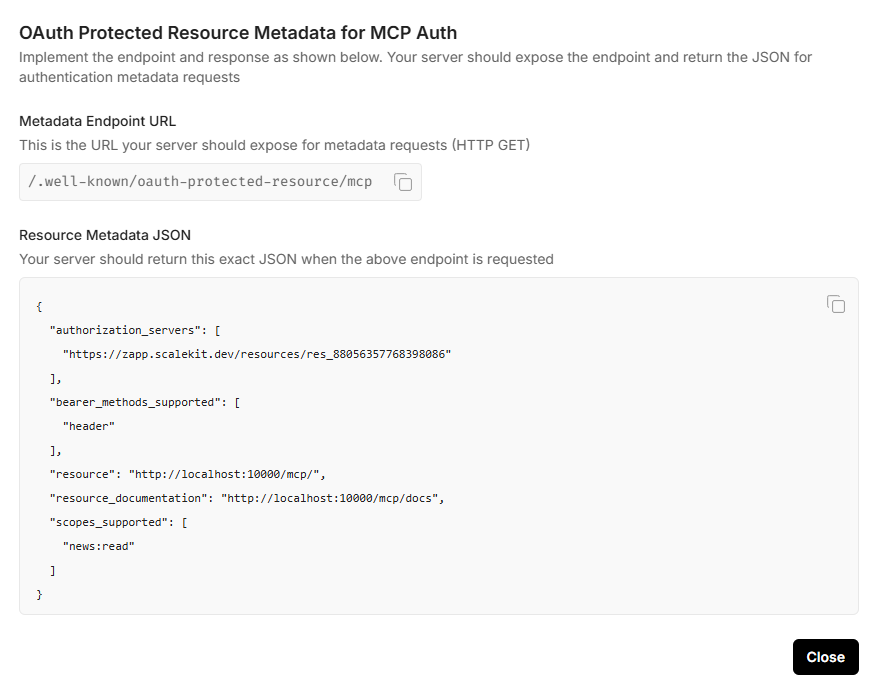
Useful resource Metadata Instance
Your metadata will look just like this (however distinctive to your account):
Metadata Endpoint URL:
/.well-known/oauth-protected-resource/mcpUseful resource Metadata JSON:
{
  "authorization_servers": [
    "https://zapp.scalekit.dev/resources/res_88056357768398086"
  ],
  "bearer_methods_supported": ["header"],
  "useful resource": "http://localhost:10000/mcp/",
  "resource_documentation": "http://localhost:10000/mcp/docs",
  "scopes_supported": ["news:read"]
}
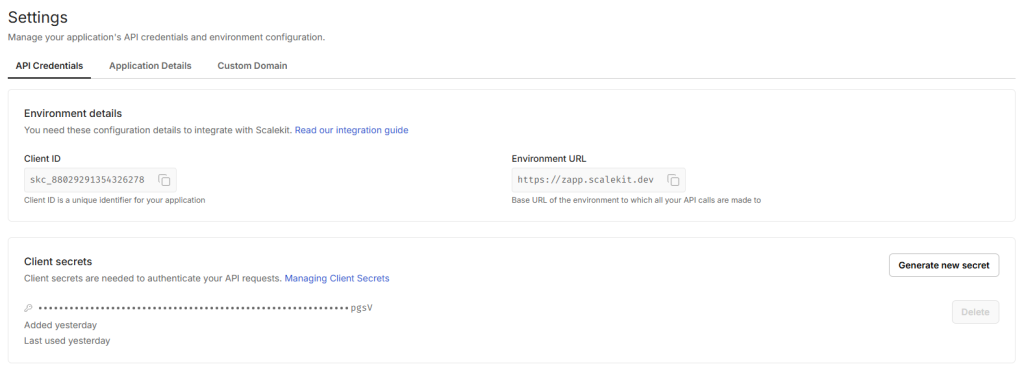
Get API Credentials
- Go to Settings → API Credentials.
- Copy your Consumer ID and Atmosphere URL.
- Click on Generate New Secret to create your Secret Key.
Retailer these values securely — we’ll want them later for configuration.
.env
We are going to now create a .env file with the next variables
ALPHA_VANTAGE_API_KEY=
METADATA_JSON_RESPONSE=

SCALEKIT_ENVIRONMENT_URL=
SCALEKIT_CLIENT_ID=
SCALEKIT_CLIENT_SECRET=
SCALEKIT_RESOURCE_METADATA_URL=
SCALEKIT_AUTHORIZATION_SERVERS=
SCALEKIT_AUDIENCE_NAME=
SCALEKIT_RESOUCE_NAME=
SCALEKIT_RESOUCE_DOCS_URL=
ALPHA_VANTAGE_API_KEY
Your private API key from Alpha Vantage, used to fetch inventory sentiment information.
METADATA_JSON_RESPONSE
The JSON response generated by Scalekit whenever you configure your MCP server.
It comprises particulars like authorization servers, supported scopes, and documentation URLs.
SCALEKIT_ENVIRONMENT_URL
The atmosphere URL beneath the Settings part.
SCALEKIT_CLIENT_ID
The shopper ID talked about beneath the Settings part.
SCALEKIT_CLIENT_SECRET
The key key you generate beneath Settings → API Credentials.
SCALEKIT_RESOURCE_METADATA_URL
The URL uncovered by your MCP server for metadata requests.
Instance:
http://localhost:10000/.well-known/oauth-protected-resource/mcpSCALEKIT_AUTHORIZATION_SERVERS
The URL pointing to the MCP Server Identifier issued by Scalekit.
Instance:
https://.scalekit.dev/assets/res_*************** Yow will discover the subdomain from the useful resource metadata JSON

SCALEKIT_AUDIENCE_NAME
The viewers (aud) declare utilized in entry tokens to validate requests. Take a look at the FULL CODES here.
http://localhost:10000/mcp/SCALEKIT_RESOUCE_NAME
The useful resource title to your MCP server. Typically, this is identical as SCALEKIT_AUDIENCE_NAME. Take a look at the FULL CODES here.
SCALEKIT_RESOUCE_DOCS_URL
The URL the place your MCP server’s documentation is hosted.
Instance:
http://localhost:10000/mcp/docsWe are going to first create a config file to load all of the atmosphere variables which can be used later. Take a look at the FULL CODES here.
import os
from dotenv import load_dotenv

load_dotenv()

class Settings():
    ALPHA_VANTAGE_API_KEY = os.environ.get('ALPHA_VANTAGE_API_KEY')
    METADATA_JSON_RESPONSE = os.environ.get('METADATA_JSON_RESPONSE')
    SCALEKIT_ENVIRONMENT_URL = os.environ.get('SCALEKIT_ENVIRONMENT_URL')
    SCALEKIT_CLIENT_ID = os.environ.get('SCALEKIT_CLIENT_ID')
    SCALEKIT_CLIENT_SECRET = os.environ.get('SCALEKIT_CLIENT_SECRET')
    SCALEKIT_RESOURCE_METADATA_URL = os.environ.get('SCALEKIT_RESOURCE_METADATA_URL')
    SCALEKIT_AUTHORIZATION_SERVERS = os.environ.get('SCALEKIT_AUTHORIZATION_SERVERS')
    SCALEKIT_AUDIENCE_NAME = os.environ.get('SCALEKIT_AUDIENCE_NAME')
    SCALEKIT_RESOUCE_NAME = os.environ.get('SCALEKIT_RESOUCE_NAME')
    SCALEKIT_RESOUCE_DOCS_URL = os.environ.get('SCALEKIT_RESOUCE_DOCS_URL')
    PORT = 10000


settings = Settings()
This code block fetches real-time information sentiment information for a given inventory ticker utilizing the Alpha Vantage API. It retrieves the highest three latest articles, summarizing their title, abstract, supply, and publication time for fast insights. Take a look at the FULL CODES here.
from mcp.server.fastmcp import FastMCP
from typing import Any
import os
import httpx
from typing import Dict, Record
from config import settings

# Create an MCP server
mcp = FastMCP("finance-news")

BASE_URL = "https://www.alphavantage.co/question"

async def call_alpha_vantage(endpoint: str, params: dict[str, Any]) -> dict[str, Any] | None:
    """Generic async caller to Alpha Vantage."""
    params["apikey"] = settings.ALPHA_VANTAGE_API_KEY
    params["function"] = endpoint
    async with httpx.AsyncClient() as shopper:
        strive:
            response = await shopper.get(BASE_URL, params=params, timeout=30.0)
            response.raise_for_status()
            return response.json()
        besides Exception:
            return None

@mcp.device()
async def get_news_sentiment(ticker: str) -> str:
    """Get information sentiment information for a inventory ticker.

    Args:
        ticker: Inventory ticker image (e.g., MSFT, AAPL)
    """
    information = await call_alpha_vantage("NEWS_SENTIMENT", {"tickers": ticker.higher()})
    if not information or "feed" not in information:
        return "Could not retrieve information sentiment."

    articles = information["feed"][:3]
    outcome = []
    for merchandise in articles:
        outcome.append(f"""
    📰 {merchandise['title']}
    Abstract: {merchandise['summary']}
    Supply: {merchandise['source']} | Revealed: {merchandise['time_published']}
    """)
    return "n---n".be a part of(outcome)
This middleware acts as an authorization layer to your MCP server, guaranteeing that solely authenticated requests are processed. It makes use of the ScaleKit shopper to validate entry tokens on each incoming request. When a request is available in, the middleware first checks if the trail is public, equivalent to metadata endpoints beneath /.well-known/.
If the request isn’t for a public path, it appears for an Authorization header with a sound Bearer token. The token is then validated utilizing ScaleKit. If the token is lacking, invalid, or expired, the middleware instantly responds with a 401 Unauthorized error and a structured error message. Take a look at the FULL CODES here.
If the token is legitimate, the request is handed alongside to the following layer of the applying. Moreover, logging is built-in all through the method to seize key occasions, making it simpler to debug and audit authentication flows.
Lastly, this middleware can be imported and added to the server file to guard all safe endpoints. Take a look at the FULL CODES here.
import json
import logging
from fastapi import HTTPException, Request
from fastapi.safety import HTTPBearer
from fastapi.responses import JSONResponse
from scalekit import ScalekitClient
from starlette.middleware.base import BaseHTTPMiddleware

from config import settings

# Configure logging
logging.basicConfig(
    degree=logging.INFO,
    format="%(asctime)s - %(title)s - %(levelname)s - %(message)s"
)
logger = logging.getLogger(__name__)

# Safety scheme for Bearer token
safety = HTTPBearer()

# Initialize ScaleKit shopper
scalekit_client = ScalekitClient(
    settings.SCALEKIT_ENVIRONMENT_URL,
    settings.SCALEKIT_CLIENT_ID,
    settings.SCALEKIT_CLIENT_SECRET
)

# Authentication middleware
class AuthMiddleware(BaseHTTPMiddleware):
    async def dispatch(self, request: Request, call_next):
        if request.url.path.startswith("/.well-known/"):
            return await call_next(request)

        strive:
            auth_header = request.headers.get("Authorization")
            if not auth_header or not auth_header.startswith("Bearer "):
                increase HTTPException(status_code=401, element="Lacking or invalid authorization header")

            token = auth_header.break up(" ")[1]

            request_body = await request.physique()

            # Parse JSON from bytes
            strive:
                request_data = json.masses(request_body.decode('utf-8'))
            besides (json.JSONDecodeError, UnicodeDecodeError):
                request_data = {}

            strive:
                scalekit_client.validate_access_token(token)

            besides Exception as e:
                increase HTTPException(status_code=401, element="Token validation failed")

        besides HTTPException as e:
            return JSONResponse(
                status_code=e.status_code,
                content material={"error": "unauthorized" if e.status_code == 401 else "forbidden", "error_description": e.element},
                headers={
                    "WWW-Authenticate": f'Bearer realm="OAuth", resource_metadata="{settings.SCALEKIT_RESOURCE_METADATA_URL}"'
                }
            )

        return await call_next(request)
This script units up a FastAPI software built-in with an MCP server for inventory information sentiment evaluation. It begins by importing the required libraries, together with FastAPI, CORS middleware, and a customized authentication middleware. Take a look at the FULL CODES here.
The appliance lifecycle is managed via a mixed lifespan context utilizing an asynchronous context supervisor, guaranteeing that the finance_news_server.session_manager, which is actually the inventory sentiment logic we created, runs easily through the app’s runtime. CORS middleware is configured to permit cross-origin requests, which is beneficial throughout improvement however must be restricted in manufacturing environments.
A brand new endpoint, /.well-known/oauth-protected-resource/mcp, is added to serve metadata for OAuth 2.1 protected useful resource discovery. This endpoint supplies essential particulars equivalent to supported authorization servers, bearer token strategies, useful resource title, documentation URL, and supported scopes — on this case, mcp:instruments:information:learn.
The MCP server is created utilizing the finance_news_server.streamable_http_app() operate and mounted on the root path /, making the core MCP functionalities accessible via the principle app. Authentication is enforced by integrating the AuthMiddleware, and the script ensures that this middleware is correctly added to the server file.
Lastly, the principle() operate runs the applying utilizing uvicorn, with logging enabled on the debug degree, binding the server to localhost on the configured port. Take a look at the FULL CODES here.
import contextlib
import uvicorn
from fastapi import FastAPI
from fastapi.middleware.cors import CORSMiddleware
import json
from auth import AuthMiddleware
from config import settings
from finance import mcp as finance_news_server
# Create a mixed lifespan to handle the MCP session supervisor
@contextlib.asynccontextmanager
async def lifespan(app: FastAPI):
async with finance_news_server.session_manager.run():
yield
app = FastAPI(lifespan=lifespan)
# Add CORS middleware
app.add_middleware(
CORSMiddleware,
allow_origins=["*"], # In manufacturing, specify your precise origins
allow_credentials=True,
allow_methods=["GET", "POST", "PUT", "DELETE", "OPTIONS"],
allow_headers=["*"],
)
# MCP well-known endpoint
@app.get("/.well-known/oauth-protected-resource/mcp")
async def oauth_protected_resource_metadata():
"""
OAuth 2.0 Protected Useful resource Metadata endpoint for MCP shopper discovery.
Required by the MCP specification for authorization server discovery.
"""
return {
"authorization_servers": [settings.SCALEKIT_AUTHORIZATION_SERVERS],
"bearer_methods_supported": ["header"],
"useful resource": settings.SCALEKIT_RESOURCE_NAME,
"resource_documentation": settings.SCALEKIT_RESOURCE_DOCS_URL,
"scopes_supported": [
"mcp:tools:news:read"
],
}
# Create and mount the MCP server with authentication
mcp_server = finance_news_server.streamable_http_app()
app.add_middleware(AuthMiddleware)
app.mount("/", mcp_server)
def fundamental():
"""Important entry level for the MCP server."""
uvicorn.run(app, host="localhost", port=settings.PORT, log_level="debug")
if __name__ == "__main__":
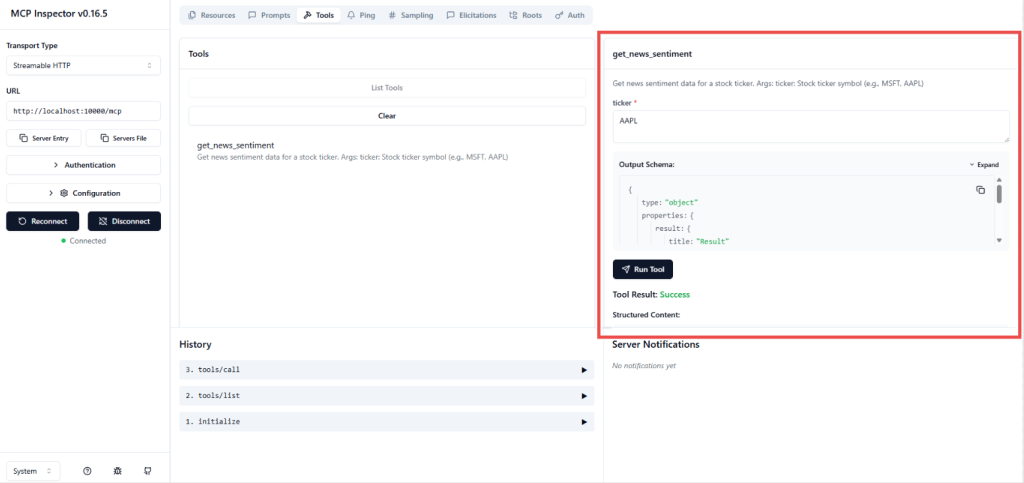
fundamental()To run the server, execute python server.py, which can begin the applying on localhost:10000. To check the setup, open one other terminal and run:
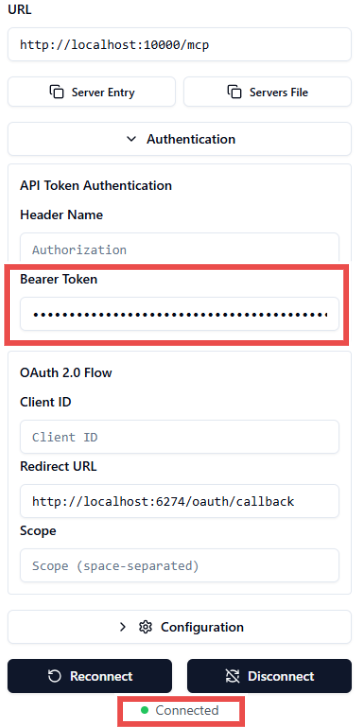
npx @modelcontextprotocol/inspectorAs soon as the MCP Inspector is operating, enter http://localhost:10000/mcp because the server URL. In the event you try to attach with out offering legitimate credentials, you’ll encounter the next error:
Connection Error: Test in case your MCP Server is operating and if the proxy token is accurately configured.
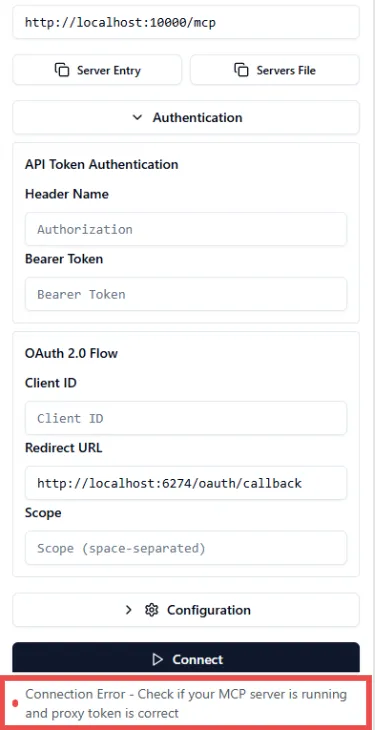
Now, present the Bearer token utilizing the key ID you generated in Scalekit. As soon as entered, you may be efficiently authenticated and may begin making device calls.
Take a look at the FULL CODES here. Be happy to take a look at our GitHub Page for Tutorials, Codes and Notebooks. Additionally, be at liberty to observe us on Twitter and don’t neglect to hitch our 100k+ ML SubReddit and Subscribe to our Newsletter.

I’m a Civil Engineering Graduate (2022) from Jamia Millia Islamia, New Delhi, and I’ve a eager curiosity in Information Science, particularly Neural Networks and their software in numerous areas.